AutoTune/Adv Configuration
Due to the differences in frame types and manufacturing, each copter requires calibration of the PID controller. A full explanation of the copter's PID controller, including a general background of the science and a description of manual advanced configurations is provided. The basic function of PID controller is to take the received radio signal from the pilot and properly translate it into vehicle flight commands. This control logic is also applied when the vehicle is performing autonomous flight and proper calibration is critical otherwise the copter will overcompensate or under-compensate it's movements and be unable to maintain a safe flight. Although manual calibration of each parameter is possible, and a description is provided in the link above, the easier method is to perform an auto tune. Using this flight mode the copter will automatically perform a PID evaluation and reset the internal parameters according the systems algorithms. Complete documentation on performing an AutoTune is provided. It is important to note however, that in the video demonstration the user performs a auto tune using a 7th channel switch. This same procedure can be done by sending the command via mission planner if you do not have a transmitter that has more than 6 channels.
Although briefly discussed earlier each of these parameters can be adjusted manually and full documentation for advanced configuration is available. However, it is suggested that only the parameters for wave point navigation are adjusted manually. These parameters will take effect during autonomous flight and information regarding WP tuning is provided.
Parameter Overview
For the basic user the steps described in the initial calibration and advanced configuration will be sufficient to adjust any copter parameters. However, if unforeseen issues arise in the drone or if more customization is desired, Mission Planner provides an easy platform to adjust the drone's software. To accesses the copter's complete parameter list first connect to the drone (use the connect button in the top right of the screen). Once connected a full parameter list will be displayed under the config/tuning tab. Full Parameter Tree and Full Parameter List will both provide access to all the system's parameters, but display different them in different formats. You can download our parameter list at this link: Param_Hex. The copter's parameters are the internal software settings that dictate how the copter operates. These functions include everything from flying speed to landing speed to how data is interpreted from internal sensors. A complete parameter description is provided on the arducopter website; however, it is highly recommended that only experienced users change the parameters as randomly changing parameters can result in flight errors and loss of vehicle control.
Vibration Damping
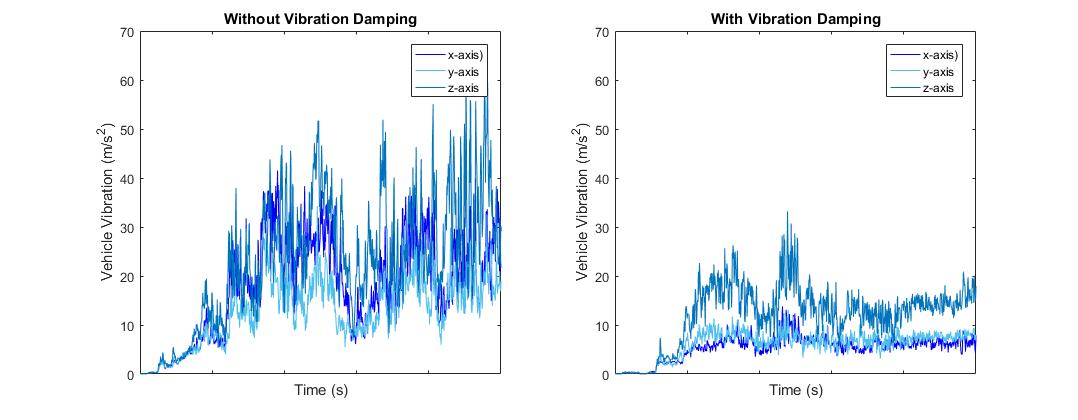
Due to the sensitivity of the control board's accelerometer, vibration reduction is necessary to maintain stable flight. During an autonomous flight the Pixhawk Mini controls position and vehicle speed using a feedback loop called an Extended Kalman Filter (EKF). Excess vibration in the frame can cause vehicle position to be incorrectly calculated resulting in the copter spontaneously rising in altitude or circling uncontrollably.

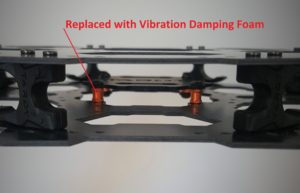
These vibrations can result from imbalances inthe propellers and stiff rigidity in the frame. For the first version of the vehicle, a damping modification was necessary because the Pixhawk Mini was integrated into the frame of the copter. Although the integrated installation safely encompasses crucial components, the standard Tarot frame transferred vibrations easily due to the rigidity of the carbon fiber. To resolve this issue the team installed vibration damping foam pads to the raised platform of the Tarot frame and the bottom of the Pixhawk Mini. This modification created an anti-vibration platform and significantly reduced the measured vibration in the Pixhawk Mini. For specifics on how to measure vibration data using the Mission Planner interface reference: Measuring Vibration.

What is 3DR Telemetry?
The 3DR Telemetry Radio that is used on our vehicle is a form of a SiK Telemetry Radio. A SiK Telemetry Radio is a open-source radio platform. These radios also use an open-source firmware which was specially designed to work well with MAVLink packets and to be used with Mission Planner. The main features of this radio include two different frequency variants, data rates up to 250kbps and receiver sensitivity up to -121dbm. While there are many other features of these radios, it is used with our vehicle build to achieve the best performance in telemetry. For more information, you can check out Ardupilot's page on SiK Telemetry.