The following section provides initial setup instructions for all software used on-board the UAV-RT Companion Computer. Hardware installation instructions can be found under System Assembly. For the UAV-RT system an UDOO is used as the companion computer and is responsible for radio signal collection, processing, and storage. The system also maintains a Wi-Fi hotspot, FTP connection (to transfer files to the ground control station), and UDP connection (to start the program remotely from the ground control station). Step-by-step instructions are provided for imaging the UDOO and installing the necessary programs. Steps 1-3 are a summary of the UDOO Getting Started Instructions and explain how to load the operating system and boot the board for the first time. Step 4-5 details the specific programs downloaded and initial configurations set for this project.

Before beginning please make sure you have the following supplies available:
- UDOO
- 64GB - Micro SD Card
- Keyboard/Mouse
- Ethernet Cable
- Monitor with HDMI hookup
- Flash-drive (at least 8GB)
Step 1: Imaging
To install an operating system to the UDOO it is necessary to create a bootable flash drive. While summary instructions are provided below, it is easiest to follow the directions provided on the UDOO website. Follow the Getting Started link and scroll down to Chapter Three. The Getting Started link shows how to install Windows and Ubuntu onto the UDOO, but we are going to use Linux Mint (an offshoot of Ubuntu) on the UDOO. The first step is to download the required OS system onto a USB drive. The operating system used is a Linux based OS and will run the required software on the UDOO. Once installed to the USB, the USB can be plugged into the UDOO and the operating system installed onto the microSD card. Again, for a video explanation on how to create a bootable flash drive reference Chapter Three on UDOO's getting started webpage.
Software
- UNetbootin: program used create bootable flashdrive on Windows.
- Linux Mint : OS system installed onboard the UDOO (we are running Mint 19 64-bit Cinnamon)
Install Steps
- Download the latest Linux Mint OS
- Format your flash drive to "FAT 32"
- Open UNetbootin and choose the "Diskimage" option towards the bottom of the window. Make sure the blank USB you intend to download the image to is plugged into the computer before you attempt to mount the OS to the USB
- You should have already downloaded the Linux Mint OS from the website, that file will be an ISO file. You will need to select that file in the UNetbootin menu
- Now double check that you are selecting the right drive to mount it to and begin imaging (if you do not see your flash drive, plug in the flash drive and relaunch UNetbootin)
- Once the imaging is finished eject the flash drive and plug it into your UDOO
Step 2: Booting up
If you are referencing the UDOO getting started page, this step is the fourth chapter on the website.
Booting Up the UDOO
- Now that you have a USB drive with a bootable OS on it, you can now connect the USB drive into the UDOO. ENSURE you have the other components connected as well including: a monitor, a keyboard, a mouse, the microSD storage and a Ethernet cable/Wi-Fi for internet.
- With the USB flash drive connected power on the UDOO. Once powered on, immediately start pressing the ESC button on your keyboard until you get brought to a menu with boot-up menu. If you were not able to get to this menu with six option and are instead brought to a command prompt window, power off the UDOO and try again.
- On this menu select the "Boot Manager" option to be brought to the BIOS. You will want to focus on the top selections where it says EFI boot devices. Choose your USB drive that has the OS on it and it will bring you to a black screen with a few option to choose from. Press enter on the first option that says "Start Linux Mint 19 Cinnamon 64 bit" and this will bring you to a temporary live session.
Step 3: Installation
If you followed Steps 1-2 you should now be on a temporary Linux Mint desktop. Follow the steps below to download the OS to the microSD card on the UDOO. For detailed documentation reference Linux Mint.
- Select the disk icon that says "Install Linux Mint." This will bring up the wizard for installing the operating system.
- Follow the onscreen setup instructions from the install wizard to install the OS onto the microSD card. Be sure you have the Ethernet cable plugged into the UDOO as the installation will want to use the internet to install third party software. Reference notes below.
-
- Select "Install third party software" when prompted
- When prompted to install Linux make sure you select the 64GB micro SD card, not the 32 GB GB MMC built in to the UDOO
- When creating user name select "log in automatically" (makes field use easier)
Step 4: Programs
Once the OS system is installed to the UDOO (Steps 1-3) and the computer has been restarted, it is necessary to install additional software. This section details the specific software packages that were installed for the UAV-RT project. The UDOO will need an internet connection to successfully download these programs. To enter the following code open a new terminal on the UDOO (black icon in the lower left corner) and type the code below for each package. Note unless otherwise specified this code needs to be entered one line at a time and may require you to type a "y" to approve the download
Install Git, Cmake, and Setup Programs
Allows user to easily install other packages. Basic setup up for adding functionality to Linux.
sudo apt install git  (Install Git)
sudo apt-get install cmake  (Installs cmake)
sudo apt-get install build-essential  (creates necessary connections)
sudo apt-get install libusb-1.0-0-dev  (Installs usb connection software)
sudo apt-get install libboost-all-dev  (Install Boost)
sudo apt-get install swig
sudo apt-get install libfftw3-dev
sudo apt-get install vsftpd  (Installs server to host FTP connection)
sudo apt install pip
sudo apt -get install -y python -setuptools
pip install wheel
sudo pip install pymavlink==2.0.6
sudo pip install mavproxy==1.6.2
pip install lxml future
pip install dronekit
pip install dronekit-sitl
git clone https://github.com/mossmann/hackrf.git  (Installs board software Hack-RF)
cd hackrf
cd host
mkdir build
cd build
cmake ../ -DINSTALL_UDEV_RULES=ON
make
sudo make install
sudo ldconfig
cd
Build Airspy:
This software is required for running GNU radio. The packages include software that allow the user to connect an Airspy through GNU Radio.
wget https://github.com/airspy/airspyone_host/archive/master.zip
unzip master.zip
cd airspyone_host-master
mkdir build
cd build
cmake ../ -DINSTALL_UDEV_RULES=ON
make
sudo make install
sudo ldconfig
cd
rm master.zip
Build GNU Radio:
Code completes the build from above and downloads GNU radio.
cd airspyone_host-master/build
rm -rf *
sudo apt install gnuradio (Link for more info:https://wiki.gnuradio.org/index.php/InstallingGR)
sudo apt-get install gnuradio-dev
sudo apt-get install gr-iqbal (Install IQ Bal software)
git clone git://git.osmocom.org/gr-osmosdr
cd gr-osmosdr/
mkdir build
cd build
cmake ../
make
sudo make install
sudo ldconfig
TimeSync Block
To record incoming radio data the team developed it's own custom GNU radio block to time sync incoming IQ data and flight data from the drone's Pixhawk. While GNU radio provides a complete example, these instruction demonstrate how to build the template for this block. Please note that the $ sign shows which folder you are in in Linux. In a new terminal type the following code:
gr_modtool newmod timesync
cd gr-timesync
gr-timesync$ gr_modtool add -t sync -l python
Match the generated code as below:
gr-timesync$ gr_modtool add -t sync -l python
GNU Radio module name identified: pixstream_source
Language: Python
Enter name of block/code (without module name prefix): pixstream_source
Block/code identifier: pixstream_source
Enter valid argument list, including default arguments: timesync
Add Python QA code? [Y/n] y
Adding file 'Python/pixstream_source.py'...
Adding file 'Python/qa_pixstream_source.py'...
Editing Python/CMakeLists.txt...
Adding file 'grc/timesync_pixstream_source.xml'...
Editing grc/CMakeLists.txt...
Once the folder finishes creating, leave the terminal alone and open a new folder (icon in the lower right corner). Navigate to the python folder in the newly created gr-timesync folder. The address should be similar to the following where you replace "username" with your user name: /home/username/gr-timesync/python. Once the folder is located open pixstream_source.py and replace code with script below (note you may need to open the code in a new window for the formatting to copy properly, this can easily be done by hovering over the top right corner of the code and selecting the appropriate option).
#!/usr/bin/env python
# -*- coding: utf-8 -*-
#
# Copyright 2018 <+YOU OR YOUR COMPANY+>.
#
# This is free software; you can redistribute it and/or modify
# it under the terms of the GNU General Public License as published by
# the Free Software Foundation; either version 3, or (at your option)
# any later version.
#
# This software is distributed in the hope that it will be useful,
# but WITHOUT ANY WARRANTY; without even the implied warranty of
# MERCHANTABILITY or FITNESS FOR A PARTICULAR PURPOSE.  See the
# GNU General Public License for more details.
#
# You should have received a copy of the GNU General Public License
# along with this software; see the file COPYING.  If not, write to
# the Free Software Foundation, Inc., 51 Franklin Street,
# Boston, MA 02110-1301, USA.
#

import numpy
from gnuradio import gr

import time
import os
import datetime
from dronekit import connect, VehicleMode
import subprocess
import sys
import platform
import math
import serial


class pixstream_source(gr.sync_block):
    """
    docstring for block pixstream_source
    """

    def __init__(self, telem_file_path):
        gr.sync_block.__init__(self,
                               name="pixstream_source",
                               in_sig=None,
                               out_sig=[(numpy.float32, 7)])

        # Check the OS to see what connection string to use to talk to Pixhawk

        osName = platform.system()
        if(osName == 'Windows'):
            connection_string = "COM3"  # for connection via USB
        elif(osName == 'Darwin'):  # Darwin is the result for a Mac
            connection_string = "/dev/cu.usbmodem1"
            # The Dronekit site doesn't have a / in the front of the conenction
            # but it is necessary
        else:
            connection_string = "/dev/ttyACM0"  # for connection via USB

        print(osName)

        # connection_string = "127.0.0.1:14550"

        # Now connect to Pixhawk
        print("Connecting to Pixhawk")
        self.vehicle = connect(connection_string, wait_ready=True, rate=10)
        print("Connected!")

        # Create the telemetry log file and add the header
        self.now = datetime.datetime.now()
        self.telem_file_name = telem_file_path+"/telem - " +
            self.now.strftime("%Y-%m-%d-T%H_%M_%S") + ".flt"
        file = open(self.telem_file_name, "w")
        file.write("Time_s"+"t""Heading_deg"+"t"+"Pitch_rad"+"t"+"Roll_rad" +
                   "t"+"Yaw_rad"+"t"+"Lat"+"t"+"Long"+"t"+"Alt_m_AGL"+"n")
        file.close


    def write_telem(self, the_data):
        # This function is used to write the data to the tab delimited text file
        file = open(self.telem_file_name, "a")
        # print str(the_data)
        # Time, Heading, Pitch, Roll, Yaw, Lat, Lon, Alt-AGL
        file.write(str(the_data[0, 0])+"t"+str(the_data[0, 1])+"t"+str(the_data[0, 2])+"t"+str(the_data[0, 3]) +
                   "t"+str(the_data[0, 4])+"t"+str(the_data[0, 5])+"t"+str(the_data[0, 6])+"t"+str(the_data[0, 7])+"n")
        file.close

    def work(self, input_items, output_items):
        '''This method is called by the gnuradio code much more frequently than
        the 4-10 Hz that we want to save data. To limit the data rate, the
        method checks to see if the current time has a zero in the tenths place.
        If it does, it will call the 'write_telem' method to write the current
        telemetry data to the log file. If it isn't yet time to write the data,
        the method will sleep for a hundreth of a second and check again. The
        functionality of this method relies on the fact that the rest of the
        gnuradio code is running much faster and calling this function more
        frequently than every 0.01 seconds.
        '''
        # Determine the the time when the work method is called
        starttime = time.time()
        # Find the next 10th of a second. That is when we want to write data
        nexttime = (math.floor(starttime*10)+1)/10
        # nexttime = (math.floor(starttime*self.save_rate)+1)/self.save_rate
        # print "Start Time is: ", starttime
        # print "Next  Time is: ", nexttime
        nowtime = starttime  # nowtime is now. Will be updated later
        while nowtime <= nexttime:
            # <+signal processing here+>
            time.sleep(0.01)
            # time.sleep(1/self.save_rate*1/10)
            nowtime = time.time()
        # Once we get to this point (out of the while loop), we are at the
        # of the second when we want to write data....

        # Set up and fill the data vector
        data = numpy.zeros((1, 8))
        data[0, 0] = time.time()
        data[0, 1] = self.vehicle.heading
        data[0, 2] = self.vehicle.attitude.pitch
        data[0, 3] = self.vehicle.attitude.roll
        data[0, 4] = self.vehicle.attitude.yaw
        data[0, 5] = self.vehicle.location.global_relative_frame.lat
        data[0, 6] = self.vehicle.location.global_relative_frame.lon
        data[0, 7] = self.vehicle.location.global_relative_frame.alt
        # Write the data
        self.write_telem(data)

        # Below is where we stream the data out to gnu radio
        '''Setup the out variable that gnuradio is expecting to be the size that
        is requested. In my tests to this point, the output_items length
        is on the order of 1500 elements. I haven't figured out how to limit
        which would have made it able to just send the 'data' variable. It looks
        like you can change the output buffer of a block written in C++, but now
        one written in python. We have to use python because that is the API we
        have for Dronekit.
        '''
        out = output_items[0]
        out[:, 0] = self.vehicle.heading
        out[:, 1] = self.vehicle.attitude.pitch
        out[:, 2] = self.vehicle.attitude.roll
        out[:, 3] = self.vehicle.attitude.yaw
        out[:, 4] = self.vehicle.location.global_relative_frame.lat
        out[:, 5] = self.vehicle.location.global_relative_frame.lon
        out[:, 6] = self.vehicle.location.global_relative_frame.alt

        return len(output_items[0])
Once you have copied the above code save the file and exit the window. Now navigate to the XML code in the grc folder. As described above, the address should be similar to the following: home/username/gr-timesync/grc. Open timsync_pixstream_source.xml and replace the code with script below (again you may need to open the code in a separate window to preserve formatting):
<?xml version="1.0"?>
<block>
  <name>pixstream_source</name>
  <key>timesync_pixstream_source</key>
  <category>Time Sync</category>
  <import>import timesync</import>
  <make>timesync.pixstream_source($telem_file_path)</make>
  <!-- Make one 'param' node for every Parameter you want settable from the GUI.
       Sub-nodes:
       * name
       * key (makes the value accessible as $keyname, e.g. in the make node)
       * type -->
  <!--<param>
    <name>Telemetry Save Rate (Hz)</name>
    <key>save_rate</key>
    <type>int</type>
  </param> -->

   <param>
     <name>Telemetry Log File Path</name>
    <key>telem_file_path</key>
    <type>string</type>
  </param>

  <!-- Make one 'sink' node per input. Sub-nodes:
       * name (an identifier for the GUI)
       * type
       * vlen
       * optional (set to 1 for optional inputs) -->
  <!--<sink>
    <name>in</name>
    <type>float</type>
  </sink> -->

  <!-- Make one 'source' node per output. Sub-nodes:
       * name (an identifier for the GUI)
       * type
       * vlen
       * optional (set to 1 for optional inputs) -->
  <source>
    <name>out</name>
    <type>float</type> <vlen>7</vlen>
  </source>
</block>
Save the XML file and exit. Return to the terminal window. Make sure you are in the "gr-timesync$" folder still. If not open a new terminal and type cd gr-timesync. Type the following code to finish the build:
mkdir build
cd build
cmake ../
make
sudo make install
sudo ldconfig
Step 5: Configuration
Once the initial programs are installed, it necessary to configure the system. This process contains various downloads and settings necessary to make the system run smoothly in the field.
Configure FTP Server
While you installed the FTP Server during the programs installation, we need to modify the configuration file to obtain the proper settings. A UAV-RT project specific configuration file is presented here and steps are provided to copy the file. For more detailed instructions and additional modifications reference this third-party FTP Setup.
- Configuration File: vsftpd
Terminal steps:
cd /etc
sudo rm -rf vsftpd.conf
sudo wget 'https://uavrt.nau.edu/wp-content/uploads/2019/07/vsftpd.conf'
sudo service vsftpd restart
cd
Install UAV-RT Folder
This folder contains a GNU radio script for recording radio data and a script for initializing a UDP and FTP connection to the ground control station. For more information reference the radio telemetry advanced documentation. To download the UAV-RT folder download the zip file, unzip the contents, and place the content folder in the home folder. This procedure can be done manually using the link provided in option 1 or through a terminal window using the listed commands in option 2 (remember you need internet access during the installation process and must type one line at a time):
- DOWNLOAD: UAV-RT
- TERMINAL:
wget 'https://uavrt.nau.edu/wp-content/uploads/2019/07/UAV-RT.zip'
unzip UAV-RT.zip
rm UAV-RT.zip
Configure Dialout
While the all the code is successfully installed in the previous step, you need to give your username dialout access. This step allows you to access the UAV over a USB connection. In a terminal follow the steps below:
- type:
sudo usermod -a -G dialout USERNAMEwhere you replace USERNAME with your username
Setup Startup Program
Now that you have installed the UAV-RT folder in the steps above, you need to set the UDP_MAIN.py script to run on startup. This script initializes a UDP connection and FTP connection on each startup of the UDOO (reference advanced documentation for more information). These procedures use a program called crontab, for more information reference these instructions. In your terminal window follow the following steps:
- type:
crontab -e(if asked for an editor select option 1) - using your arrow keys shift your page down until you are below the comments (first blank line after '#m h dom mon dow command')
- copy the following line in the blank space:
@reboot python /home/USERNAME/UAV-RT/UDP/UDP_MAIN.pymaking sure to replace USERNAME with your username - save the script (ctrl + save)
- exit script (ctrl + x)
- if done correctly you should return to the terminal window upon completion
Wi-Fi Hotspot
The following instructions show how to set-up a hotpot using Linux Mint. The basic capabilities are built into Linux and easily accessible. This feature is used to create a network between the GCS and the companion computer and is essential for field use. Before following the instructions below make sure your Wi-Fi doggle is plugged into one of the USB ports on the UDOO. Once plugged in, the UDOO should automatically detect that a Wi=Fi card was connected. note: you will have to redo these steps if you plug in a different Wi-Fi Card.
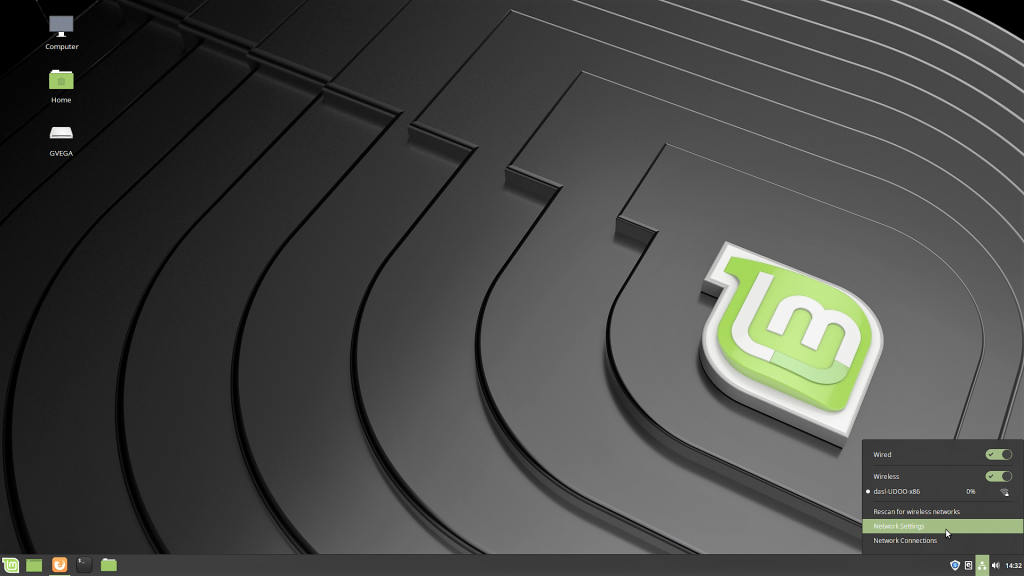
- Select Network Settings in the lower left of the screen
- Select Use Hotspot

- Select "Turn On"
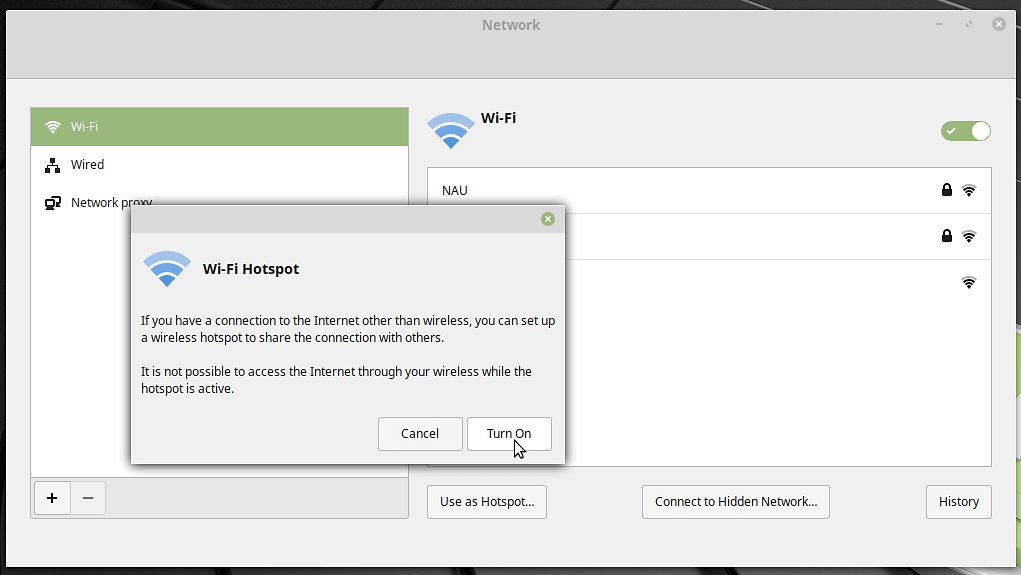
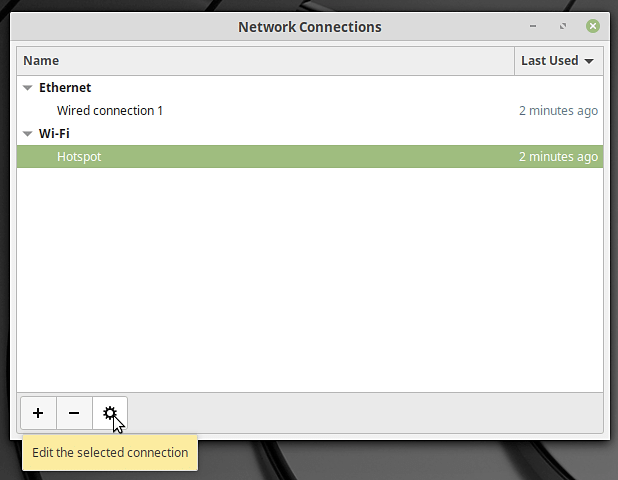
The hotspot is now connected and live. Note your password is listed below the network name. While setup is complete we need to make sure the hotspot generates automatically upon reboot. Use the folowing steps to configure the settings.
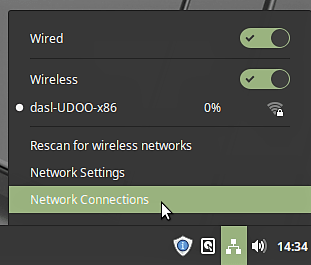
- Select Network Connections in the same lower corner of the screen
- Choose "Hotspot" under Wi-Fi and select the settings icon
- Navigate to the "General" Tab and select "Automatically connect..."
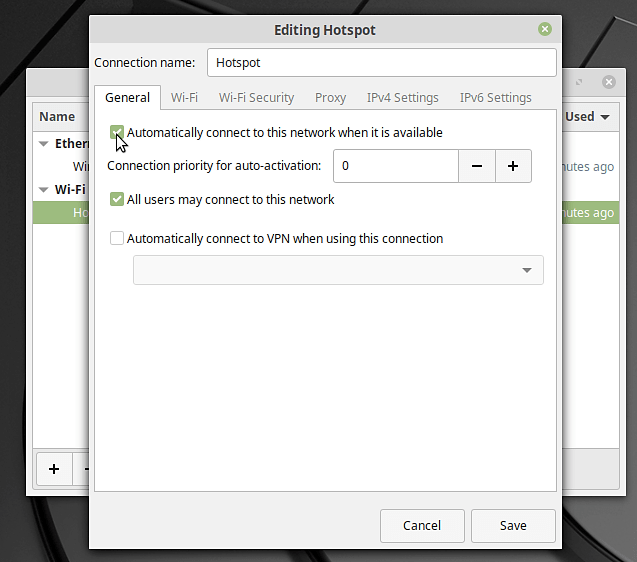
- Note you can change the Wi-Fi password under the "Wi-Fi Security" tab. Once satisfied with the settings, select "save" and exit the window.